Архив рубрики: Без рубрики

PHP Debugbar integration for Laravel

https://packagist.org/packages/barryvdh/laravel-debugbar

README

Packagist License Latest Stable Version Total Downloads

Note for v3: Debugbar is now enabled by requiring the package, but still needs APP_DEBUG=true by default!

For Laravel < 5.5, please use the 2.4 branch!

This is a package to integrate PHP Debug Bar with Laravel 5. It includes a ServiceProvider to register the debugbar and attach it to the output. You can publish assets and configure it through Laravel. It bootstraps some Collectors to work with Laravel and implements a couple custom DataCollectors, specific for Laravel. It is configured to display Redirects and (jQuery) Ajax Requests. (Shown in a dropdown) Read the documentation for more configuration options.

Screenshot

Note: Use the DebugBar only in development. It can slow the application down (because it has to gather data). So when experiencing slowness, try disabling some of the collectors.

This package includes some custom collectors:

  • QueryCollector: Show all queries, including binding + timing
  • RouteCollector: Show information about the current Route.
  • ViewCollector: Show the currently loaded views. (Optionally: display the shared data)
  • EventsCollector: Show all events
  • LaravelCollector: Show the Laravel version and Environment. (disabled by default)
  • SymfonyRequestCollector: replaces the RequestCollector with more information about the request/response
  • LogsCollector: Show the latest log entries from the storage logs. (disabled by default)
  • FilesCollector: Show the files that are included/required by PHP. (disabled by default)
  • ConfigCollector: Display the values from the config files. (disabled by default)
  • CacheCollector: Display all cache events. (disabled by default)

Bootstraps the following collectors for Laravel:

  • LogCollector: Show all Log messages
  • SwiftMailCollector and SwiftLogCollector for Mail

And the default collectors:

  • PhpInfoCollector
  • MessagesCollector
  • TimeDataCollector (With Booting and Application timing)
  • MemoryCollector
  • ExceptionsCollector

It also provides a Facade interface for easy logging Messages, Exceptions and Time

20 секретов поиска Google

Как находить только нужную информацию.

Каждый день во всемирной паутине генерируются миллионы новых документов, фото, видео и других данных. Искать в сети с каждым годом все сложнее, то и дело попадаешь на что-то ненужное, устаревшее или протянутое рекламщиками.

Поисковая система Google давно предлагает использовать специальные операторы поиска для более точного совпадения, кроме того, поисковый гигант может самостоятельно давать ответы на некоторые вопросы без переадресации на другие сайты.

Вспоминаем забытые способы поиска и узнаем новые вместе:

1. Поиск точного совпадения

Зачем: для того, чтобы поисковик не искал каждую часть нашего запроса по отдельности, используем кавычки. Например, вы помните название статьи, песни или фильма, которые ищите. Поиск будет осуществляться по точному совпадению фразы с заданным порядком слов.

Как: заключаем весь запрос в кавычки

20 секретов поиска Google. google, поиск, IT, интернет, длиннопост

2. Исключаем слово из поиска

Зачем: чтобы убрать ненужные данные в выдаче можно запретить искать определенные слова. Для этого после ввода самого запроса перечисляем признаки, которые нам не нужны.

Как: перед каждым из них ставим тире без пробела.

20 секретов поиска Google. google, поиск, IT, интернет, длиннопост

3. Ищем на определенном сайте

Зачем: чтобы начать поиск на нужном сайте без перехода на него, следует воспользоваться оператором поиска “site:”. Обратите внимание, что адрес сайта должен быть указан полностью.

Как: поисковый_запрос site:полный_адрес_сайта

20 секретов поиска Google. google, поиск, IT, интернет, длиннопост

4. Поиск похожего сайта

Зачем: понравился определенный ресурс и захотелось найти нечто подобное, воспользуйтесь оператором “related:”. Google найдет главные страницы похожих сайтов без рекламной мишуры, и накрученных результатов.

Как: related:полный_адрес_сайта

20 секретов поиска Google. google, поиск, IT, интернет, длиннопост

5. Поиск по типу файлов

Зачем: если хотите получить данные именно в определенном формате. Например, фотографию в *.png, книгу в *.fb2, ролик в *.mp4 и т.д

Как: поисковый_запрос filetype:формат_файла

20 секретов поиска Google. google, поиск, IT, интернет, длиннопост

6. Поиск в диапазоне

Зачем: если ищем что-то, связанное с цифрами, и хотим ограничить круг поиска. Нас могут интересовать данные о датах, цене, времени, координатах и т.д. Чтобы не получать в выдаче лишнюю информацию – ограничиваем поиск.

Как: поисковый_запрос число_от..число_до

20 секретов поиска Google. google, поиск, IT, интернет, длиннопост

7. Поиск забытого слова

Зачем: забыли часть слова или фразы, не можете вспомнить цитату или отгадать кроссворд. Лучший способ поиска по фразе, с недостающими словами – использование оператора “*”

Как: пишем * вместо каждого неизвестного слова

20 секретов поиска Google. google, поиск, IT, интернет, длиннопост

8. Поиск любого из вариантов

Зачем: чтобы ввести запрос один раз для поиска по нескольким критериям. Если нам не обязательно искать два, три или более вариантов, а нужен один из них.

Как: используем оператор OR

20 секретов поиска Google. google, поиск, IT, интернет, длиннопост

9. Поиск с наличием всех вариантов

Зачем: если нужны данные о нескольких объектах, упоминающихся в одном контексте. В случае такого поиска будут выведены варианты только с наличием всех искомых слов.

Как: искомое_слово_1 & искомое_слово_2

20 секретов поиска Google. google, поиск, IT, интернет, длиннопост

10. Поиск профилей в социальных сетях

Зачем: так можно сразу найти страницы искомого человека, сайта или бренда. Поиск будет проводиться по профилям с указанным именем.

Как: @искомое_имя

20 секретов поиска Google. google, поиск, IT, интернет, длиннопост

11. Поиск записей с хештегом

Зачем: так можно увидеть самые популярные записи на определенную тему, разумеется, среди тех, кто проставляет указанный в поиске тег.

Как: #хештег

20 секретов поиска Google. google, поиск, IT, интернет, длиннопост

12. Время в любом городе

Зачем: чтобы быстро узнать, спит ваш друг по WOT из Америки или уже проснулся, посмотреть, когда начинается рабочий день у иностранных партнеров или просто из любопытства.

Как: время Город

20 секретов поиска Google. google, поиск, IT, интернет, длиннопост

13. Погода в любом городе

Зачем: аналогичный поисковый запрос, но уже с погодой в указанном регионе.

Как: погода Город

20 секретов поиска Google. google, поиск, IT, интернет, длиннопост

14. Время заката или рассвета

Зачем: у каждого могут быть свои специфические причины узнавать время заката или рассвета в своем городе или любом другом населенном пункте на Земле.

Как: восход/закат Город

20 секретов поиска Google. google, поиск, IT, интернет, длиннопост

15. Котировки акций

Зачем: для тех, кто играет на бирже, следит за новостями или просто интересуется, как обстоят дела у Apple или Tesla.

Как: акции Бренд

20 секретов поиска Google. google, поиск, IT, интернет, длиннопост

16. Курс валюты

Зачем: сейчас данный вопрос интересует многих. Так почему бы не искать эту информацию быстро и просто без лишних сайтов.

Как: курс Валюта (отображается курс иностранной валюты к местной)

20 секретов поиска Google. google, поиск, IT, интернет, длиннопост

17. Конвертер величин

Зачем: можно использовать приложения для iPhone и iPad, но проще – избавиться от ненужных программ на устройстве и использовать конвертацию от Google. Тут же можно узнавать курсы любых валют, а не только местной.

Как: единица_1 единица_2

20 секретов поиска Google. google, поиск, IT, интернет, длиннопост

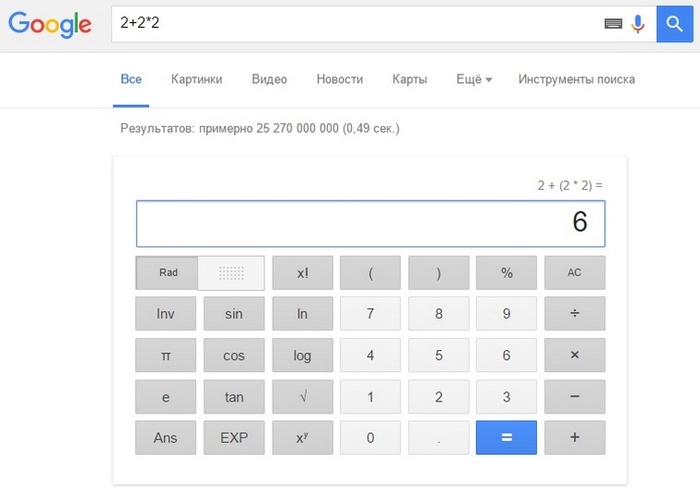
18. Калькулятор

Зачем: еще один способ быстро заменить соответствующее приложение на смартфоне, программу на компьютере или виджет в центре уведомлений. После первого поиска получим удобный онлайн-калькулятор.

Как: используем любые математические знаки +,-,*,/ с цифрами

20 секретов поиска Google. google, поиск, IT, интернет, длиннопост

19. Значение слова

Зачем: конечно, этот способ не заменит емкую и полезную заметку из толкового словаря, но быстро найти нужное значение, понять о чем идет речь или узнать ударение можно.

Как: значение искомое_слово

20 секретов поиска Google. google, поиск, IT, интернет, длиннопост

20. Перевод слова на иностранный язык

Зачем: простой способ перевести слово с русского на английский. После первого запроса откроется онлайн-переводчик от Google, в котором можно будет выбирать любые направления перевода, прослушать произношение или использовать голосовой ввод.

Как: translate искомое_слово_на_русском_языке

20 секретов поиска Google. google, поиск, IT, интернет, длиннопост

Бонус — бесполезные поисковые запросы.

Программисты Google – тоже люди, им тоже свойственно веселиться и разыгрывать пользователей. Вот они и добавили несколько «пасхалок» в стандартный поиск Google. Попробуйте осуществить поиск по таким запросам:

do a barrel roll;

askew;

zerg rush;

atari breakout (на странице поиска картинок);

Конечно, это – далеко не все поисковые возможности Google и скрытые послания от разработчиков.

Источник: Айфонс

Artisan showing inserting “32m”, “34;4m” and similar

https://stackoverflow.com/questions/33537366/artisan-showing-inserting-32m-344m-and-similar

To Resolve Color issues Download and install this https://github.com/adoxa/ansicon

Steps for Installation:

1)Extract The folder and Navigate to x86/64 (Depends upon your system)
2)Open Cmd
3)ansicon.exe -I

Simple 🙂

ansi183

Быстрое развертывание проекта на Laravel 5.4

  1. Поставили laravel через composer
  2. composer require doctrine/dbal (для работы с базами данных)
  3. composer require laravelcollective/html (для корректной работы с представлениями )
  4. composer require lubusin/laravel-decomposer (для анализа работоспособности фреймворка)
  5. composer require srlabs/centaur (контроль доступа и управление пользователями)

Настраиваем Centaur как описано в мануале

Учитываем и обрабатываем ошибку (смотри предыдущий пост)

SQLSTATE[42000]: Syntax error or access violation: 1071 Specified key was too long; max key length is 767 bytes

Готово! Чистый фреймвок для начала разработки.

Laravel 5.4 Syntax error or access violation: 1071 Specified key was too long; max key length is 767 bytes

Laravel 5.4: Specified key was too long error

Laravel 5.4 made a change to the default database character set, and it’s now utf8mb4 which includes support for storing emojis. This only affects new applications and as long as you are running MySQL v5.7.7 and higher you do not need to do anything.

For those running MariaDB or older versions of MySQL you may hit this error when trying to run migrations:

[Illuminate\Database\QueryException]
SQLSTATE[42000]: Syntax error or access violation: 1071 Specified key was too long; max key length is 767 bytes (SQL: alter table users add unique users_email_unique(email))

[PDOException]
SQLSTATE[42000]: Syntax error or access violation: 1071 Specified key was too long; max key length is 767 bytes

As outlined in the Migrations guide to fix this all you have to do is edit your AppServiceProvider.php file and inside the boot method set a default string length:

use Illuminate\Support\Facades\Schema;

public function boot()
{
    Schema::defaultStringLength(191);
}

After that everything should work as normal.

How to install Microsoft’s SQL Server Driver for PHP

There are questions on Microsoft’s SQL Server driver for PHP forum from people that cannot work out how to install the PHP driver.

PHP offers some help on choosing extensions here: http://php.net/manual/en/install.pecl.windows.php, and here: http://php.net/manual/en/install.windows.extensions.php.

It’s still a bit complicated, so here are some explicit instructions which I hope can help new users of PHP.  After a while all of this will become common sense.

Instruction notes:

  1. Microsoft’s PHP driver for SQL Server only runs with PHP 32-bit builds (as standard from http://windows.php.net/download).
  2. These instructions are only for PHP 5.2, 5.3 or 5.4. (5.5 and 5.6 supported with custom build.)
  3. I am pretending that PHP is installed into folder C:\PHP.  Replace the term C:\PHP in the instructions with whatever folder your PHP is installed into.
  4. See orange text for PHP 5.5 and 5.6 support in 32 and 64 bits.  If you do not know whether you have 64-bit PHP 5.5/5.6, start the instructions at step 5, note the orange comment in 5.3, then return to step 1 of the instructions below.

Instructions:

  1. Download Microsoft’s PHP drivers.  Open page: http://www.microsoft.com/en-us/download/details.aspx?id=20098
    1. If you have Windows Vista, Server 2008 or above, download SQLSRV30.EXE.
    2. If you have Server 2003/Windows XP or below, download SQLSRV20.EXE
    3. If you have PHP 5.5/5.6, or you have Windows XP/2003 and you want to install driver 3.0…
      1. See this post: Unofficial php_sqlsrv 3.0 and download the archive
      2. Note the text in orange in step (2.) below — you don’t need to extract the ‘source code’ folder.  Also…
        1. If you have 64-bit PHP, you need to extract only the files in sub-folder x64 of the zip file, and can ignore everything else.
        2. If you have 32-bit PHP, you should ignore the folder x64 in the zip file.
      3. Assume for step (6.) below that you downloaded SQLSRV30.EXE
      4. Remember that PHP 5.5+ does not work on Windows XP/2003 — for this OS you can only go up to PHP 5.4.
  2. Extract the entire contents of the file downloaded in (1.) to your PHP extensions folder.  This is usually a sub-folder of the location where php is installed, named ‘ext’, e.g. C:\PHP\ext.
    Note that you can use WinRAR to open the .exe file and extract the files, if you want.

    For users of the Unofficial php_sqlsrv 3.0 zip file:

    1. If you have 64-bit PHP, please extract only the contents of folder x64 of the zip file.
    2. If you have 32-bit PHP, extract the files in the root of the zip and ignore any folders.
  3. Download the SQL Server Native Client (SNAC), the PHP driver depends on it:
    1. For SQLSRV30.EXE (Windows Vista and above), go here: http://www.microsoft.com/en-us/download/details.aspx?id=29065#SNAC.  These are direct links:
      1. SQL Server 2012 Native Client for 64 Bit Windows (x64)
      2. SQL Server 2012 Native Client for 32 Bit Windows (x86)
    2. For SQLSRV20.EXE (Windows XP/2003), go here: http://www.microsoft.com/en-us/download/details.aspx?id=16978#SNAC.  Here are the direct links:
      1. SQL Server 2008r2 Native Client for 64 Bit Windows (x64)
      2. SQL Server 2008r2 Native Client for 32 Bit Windows (x86)
  4. Install the SQL Server Native Client downloaded from the previous step (3.) on the same computer that runs PHP.
  5. Find out which version of PHP you have (if you already know it, go to step 6):
    1. Open a command window (run cmd.exe)
    2. Using your PHP folder, run command: «C:\PHP\php.exe» -i | more
      ‘more’ loads the information page by page.
    3. The top line will show PHP Version => 5.x.x…  Make a note of the version.  It will start with 5.6, 5.5, 5.4, 5.3 or 5.2.  The final (3rd) number is not important.PHP 5.5+ users can also tell if they have a 64-bit or 32-bit version of PHP by looking at the reported Architecturex86 = 32-bit and x64 = 64-bit.For the next steps you may need to scroll to the 2nd information page in the console window, by pressing the space bar…
    4. For version 5.6, 5.5, 5.4 and 5.3, a little further down is setting PHP Extension Build => API… It will end with either …TS,VCn or …NTS,VCn.  Make a note of whether it says TS or NTS.  Also make a note of whether the final part is VC11, VC9 or VC6 (VC6 is still possible with PHP 5.3 and SQLSRV20.EXE).
    5. For PHP version 5.2 only: note the setting that says «Thread Safety enabled» or «Thread Safety disabled».
      «Thread Safety enabled» means TS,VC6
      «Thread Safety disabled» means NTS,VC6.
  6. Edit your php configuration file, php.ini.  Go to the end of the file and add these lines, depending on your earlier choices.  You need to know your PHP version number (5.2, 5.3, 5.4, 5.5 or 5.6), and your TS/NTS setting, and whether you have a VC11, VC9 or VC6 build, all noted from step 5. above.

    You can calculate the files you need by looking at the file name and comparing to your PHP version, and remembering whether you downloaded SQLSRV20.exe or SQLSRV30.exe.  Here are all of the combinations that are possible:

    • For the custom drivers, PHP 5.6, NTS, VC11 add lines:
      extension=php_sqlsrv_56_nts.dll
      extension=php_pdo_sqlsrv_56_nts.dll
    • For the custom drivers, PHP 5.6, TS, VC11 add lines:
      extension=php_sqlsrv_56_ts.dll
      extension=php_pdo_sqlsrv_56_ts.dll
    • For the custom drivers, PHP 5.5, NTS, VC11 add lines:
      extension=php_sqlsrv_55_nts.dll
      extension=php_pdo_sqlsrv_55_nts.dll
    • For the custom drivers, PHP 5.5, TS, VC11 add lines:
      extension=php_sqlsrv_55_ts.dll
      extension=php_pdo_sqlsrv_55_ts.dll
    • For SQLSRV30.EXE (or the custom drivers), PHP 5.4, NTS, VC9 add lines:
      extension=php_sqlsrv_54_nts.dll
      extension=php_pdo_sqlsrv_54_nts.dll
    • For SQLSRV30.EXE (or the custom drivers), PHP 5.4, TS, VC9 add lines:
      extension=php_sqlsrv_54_ts.dll
      extension=php_pdo_sqlsrv_54_ts.dll
    • For SQLSRV30.EXE (or the custom drivers), PHP 5.3, NTS, VC9 add lines:
      extension=php_sqlsrv_53_nts.dll
      extension=php_pdo_sqlsrv_53_nts.dll
    • For SQLSRV30.EXE (or the custom drivers), PHP 5.3, TS, VC9 add lines:
      extension=php_sqlsrv_53_ts.dll
      extension=php_pdo_sqlsrv_53_ts.dll
    • For SQLSRV20.EXE, PHP 5.3, NTS, VC9 add lines:
      extension=php_sqlsrv_53_nts_vc9.dll
      extension=php_pdo_sqlsrv_53_nts_vc9.dll
    • For SQLSRV20.EXE, PHP 5.3, NTS, VC6 add lines:
      extension=php_sqlsrv_53_nts_vc6.dll
      extension=php_pdo_sqlsrv_53_nts_vc6.dll
    • For SQLSRV20.EXE, PHP 5.3, TS, VC9 add lines:
      extension=php_sqlsrv_53_ts_vc9.dll
      extension=php_pdo_sqlsrv_53_ts_vc9.dll
    • For SQLSRV20.EXE, PHP 5.3, TS, VC6 add lines:
      extension=php_sqlsrv_53_ts_vc6.dll
      extension=php_pdo_sqlsrv_53_ts_vc6.dll
    • For SQLSRV20.EXE, PHP 5.2, NTS, VC6 add lines:
      extension=php_sqlsrv_52_nts_vc6.dll
      extension=php_pdo_sqlsrv_52_nts_vc6.dll
    • For SQLSRV20.EXE, PHP 5.2, TS, VC6 add lines:
      extension=php_sqlsrv_52_ts_vc6.dll
      extension=php_pdo_sqlsrv_52_ts_vc6.dll
  7. Restart your web server for the change to take effect.  That means stop and start IIS, Apache, or whatever you use, not the whole computer.

Centaur — An opinionated implementation of Cartalyst Sentinel for Laravel 5

Installation

Install the Package Via Composer:

$ composer require srlabs/centaur

Add the Service Provider to your config/app.php file:

'providers' => array(
    ...
    Centaur\CentaurServiceProvider::class, 
    ...
)

Usage in New Applications

If you are starting a new Laravel 5.1 application, this package provides a convenient way to get up and running with Cartalyst\Sentinel very quickly. Start by removing the default auth scaffolding that ships with a new Laravel 5.1 application:

$ php artisan centaur:spruce

Next, use Centaur’s scaffolding command to create basic Auth Controllers and Views in your application:

$ php artisan centaur:scaffold

Publish the Cartalyst\Sentinel assets:

$ php artisan vendor:publish --provider="Cartalyst\Sentinel\Laravel\SentinelServiceProvider"

Run your database migrations:

$ php artisan migrate

Run the Database Seeder. You may need to re-generate the autoloader before this will work:

$ composer dump-autoload
$ php artisan db:seed --class="SentinelDatabaseSeeder"

You will also need to add these routes to your routes.php file:

// Authorization
Route::get('/login', ['as' => 'auth.login.form', 'uses' => 'Auth\SessionController@getLogin']);
Route::post('/login', ['as' => 'auth.login.attempt', 'uses' => 'Auth\SessionController@postLogin']);
Route::get('/logout', ['as' => 'auth.logout', 'uses' => 'Auth\SessionController@getLogout']);

// Registration
Route::get('register', ['as' => 'auth.register.form', 'uses' => 'Auth\RegistrationController@getRegister']);
Route::post('register', ['as' => 'auth.register.attempt', 'uses' => 'Auth\RegistrationController@postRegister']);

// Activation
Route::get('activate/{code}', ['as' => 'auth.activation.attempt', 'uses' => 'Auth\RegistrationController@getActivate']);
Route::get('resend', ['as' => 'auth.activation.request', 'uses' => 'Auth\RegistrationController@getResend']);
Route::post('resend', ['as' => 'auth.activation.resend', 'uses' => 'Auth\RegistrationController@postResend']);

// Password Reset
Route::get('password/reset/{code}', ['as' => 'auth.password.reset.form', 'uses' => 'Auth\PasswordController@getReset']);
Route::post('password/reset/{code}', ['as' => 'auth.password.reset.attempt', 'uses' => 'Auth\PasswordController@postReset']);
Route::get('password/reset', ['as' => 'auth.password.request.form', 'uses' => 'Auth\PasswordController@getRequest']);
Route::post('password/reset', ['as' => 'auth.password.request.attempt', 'uses' => 'Auth\PasswordController@postRequest']);

// Users
Route::resource('users', 'UserController');

// Roles
Route::resource('roles', 'RoleController');

// Dashboard
Route::get('dashboard', ['as' => 'dashboard', 'uses' => function() {
    return view('centaur.dashboard');
}]);

This is only meant to be a starting point; you can change them as you see fit. Make sure you read through your new Auth Controllers and understand how they work before you make any changes.

Centaur automatically installs Sentinel and registers the Sentinel, Activations, and Reminders aliases for you. Detailed instructions for using Sentinel can be found here.

Usage in Existing Applications

If you already have already built out your auth views and controllers, the best way to make use of this package is to inject the AuthManager into your controllers and use it as a wrapper for Sentinel. Detailed information about the AuthManager methods and responses can be found here.

Для того чтобы консоль в phpstorm выводила строки полностью а не 80 символов всего

For windows change the terminal shell path (File->Settings->Tools->Terminal) from cmd.exe to:

cmd.exe "/K mode con:cols=500 lines=9999&cmd.exe"

as described in the bug description (https://youtrack.jetbrains.com/issue/IDEA-117552)

Edit: wrap /K in quotes as well!

Laravel 5 Carbon на русском языке

Столкнулся с проблемой вывода форматированных дат на русском языке…

Вроде бы в Carbon есть функция

formatLocalized();

которая выводит дату и время на нужном языке, только предварительно нужно установить локаль

setlocale(LC_TIME, 'ru');

Только выполнив все рекомендации ничего не заработало.

Проблема оказалась в том, что работаю под WIndows используя XAMPP

Для того, чтобы все заработало как надо, нужно было еще немного добавить:

{{iconv("cp1251", "UTF-8", $event->created_at->formatLocalized('%d %B %Y'))}}

Как оказалось, под WINDOWS, хоть проект и все файлы проекта в UTF8 нужно дополнительно приводить выведенную дату в UTF8.

Дополнения для laravel

  1. composer install
  2. php artisan key:generate
  3. composer require illuminate/html
  4. composer require doctrine/dbal
'providers' => [
	...
 
	 Illuminate\Html\HtmlServiceProvider::class,
],
 
'aliases' => [
 
	...
 
        'Form'      => Illuminate\Html\FormFacade::class,
        'Html'      => Illuminate\Html\HtmlFacade::class,
],

Для проверки:

1
2
3
php artisan tinker
> Form::text('foo')
"<input name=\"foo\" type=\"text\">"